> For the complete documentation index, see [llms.txt](https://docs.dfinery.ai/developer-guide/llms.txt). Markdown versions of documentation pages are available by appending `.md` to page URLs; this page is available as [Markdown](https://docs.dfinery.ai/developer-guide/platform/reactnative/integration.md).
# 연동하기
이 문서는 Dfinery SDK를 React Native에 통합하는 방법을 다룹니다. Dfinery SDK를 설치하면 이벤트 분석 기능과 유저 프로필 기능 그리고 액션 기능이 제공됩니다.
더 자세히 알아보려면 [리소스 및 샘플](/developer-guide/common/resource-and-sample.md)을 참조하세요.
## 시작하기 전에
### 서비스 설정
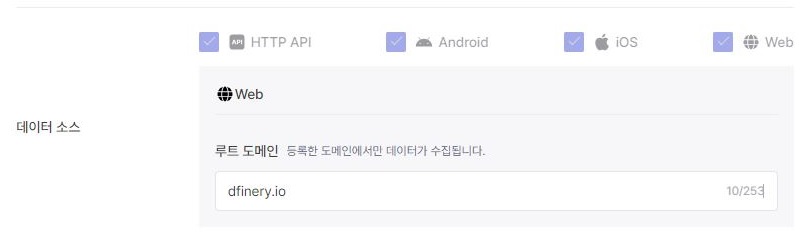
[DFINERY 콘솔](https://console.dfinery.ai/)의 서비스 관리/서비스 정보 페이지에서 데이터 소스 항목에 사용하시려는 플랫폼을 체크하셔야 합니다.
### 지원 정보
#### Android
* 최소 지원 SDK : Android 4.4+ / API 19+
* Compile SDK : 34
#### iOS
* iOS 12.0
* Xcode 16.0
### 의존성
#### Android
* [androidx.core:core:1.16.0](https://mvnrepository.com/artifact/androidx.core/core)
* [com.google.android.gms:play-services-appset:16.0.2](https://mvnrepository.com/artifact/com.google.android.gms/play-services-appset)
* [com.google.android.gms:play-services-ads-identifier:18.0.1](https://mvnrepository.com/artifact/com.google.android.gms/play-services-ads-identifier)
* [com.google.firebase:firebase-messaging:24.0.0](https://mvnrepository.com/artifact/com.google.firebase/firebase-messaging)
## SDK 설치
### 터미널에서 Dfinery 패키지를 추가합니다.
다음의 명령어를 입력하여 프로젝트에 Adbrix React Native SDK 패키지를 추가하세요.
{% tabs %}
{% tab title="NPM" %}
```
npm install @igaworks/dfinery-react-native-sdk
```
{% endtab %}
{% tab title="YARN" %}
```
yarn add @igaworks/dfinery-react-native-sdk
```
{% endtab %}
{% endtabs %}
### SDK 설정하기
{% tabs %}
{% tab title="Android" %}
**1. 권한 추가**
`AndroidManifest.xml`에 필요한 권한을 등록해주세요.
```xml
```
#### 2. Intent 갱신 설정
MainActivity의 `onNewIntent()` 메소드에 `setIntent()`를 추가해주세요.
{% tabs %}
{% tab title="Java" %}
```java
@Override
public void onNewIntent(Intent intent) {
super.onNewIntent(intent);
setIntent(intent);
}
```
{% endtab %}
{% tab title="Kotlin" %}
```kotlin
override fun onNewIntent(intent: Intent) {
super.onNewIntent(intent)
setIntent(intent)
}
```
{% endtab %}
{% endtabs %}
#### 3. 설정 완료.
다음은 작성이 완료된 `AndroidManifest.xml` 예시입니다.
```xml
```
{% endtab %}
{% tab title="iOS" %}
프로젝트의 Root 경로에서 터미널을 실행시킨 다음 입력하세요.
```bash
cd ios && pod install
```
{% endtab %}
{% endtabs %}
## SDK 초기화
### 초기화 하기
앱에서 Dfinery SDK를 초기화하려면 다음 단계를 완료하세요.
#### 1. 스크립트에 Dfinery를 추가합니다.
```javascript
import Dfinery from '@igaworks/dfinery-react-native-sdk';
```
#### 2. `useEffect()` 내에 다음 코드를 작성합니다.
{% hint style="info" %}
Service ID는 [DFINERY Console](https://console.dfinery.ai/)의 `서비스 관리/서비스 정보/Key 정보/서비스키` 경로에서 확인이 가능합니다.
{% endhint %}
```javascript
import React, { useEffect } from "react";
import Dfinery from '@igaworks/dfinery-react-native-sdk';
const App = () => {
useEffect(() => {
const config = {
[DFConfig.IOS_LOG_ENABLE]: true,
[DFConfig.ANDROID_LOG_ENABLE]: true,
[DFConfig.ANDROID_LOG_LEVEL]: DFAndroidLogLevel.VERBOSE
};
Dfinery.initWithConfig("{YOUR_SERVICE_ID}", config);
}, []);
return (
...
)
}
```
#### 3. 초기화가 완료되었습니다.
### 구글 광고 ID 설정하기(선택사항)
Google 광고 ID를 수집하기 위해선 `setGoogleAdvertisingId()` 메소드를 통해 수동으로 설정해야합니다.
#### 1. AndroidManifest.xml에 필요한 권한을 추가합니다.
```xml
```
#### 2. `setGoogleAdvertisingId()` 메소드를 통해 광고 ID를 설정합니다.
{% hint style="info" %}
`Dfinery.getGoogleAdvertisingId()`은 [Play Services Ads Identifier](https://mvnrepository.com/artifact/com.google.android.gms/play-services-ads-identifier) API를 사용하여 광고 ID를 가져옵니다. 다른 방법으로 광고 ID를 가져와 설정하셔도 무관합니다.
{% endhint %}
```javascript
Dfinery.getGoogleAdvertisingId().then((value)=>{
if(value != null){
Dfinery.setGoogleAdvertisingId(value.googleAdvertisingId, value.isLimitAdTrackingEnabled);
}
});
```
## SDK 설정
SDK 초기화 시에 로그 활성화 등의 옵션을 설정할 수 있습니다.
### 로그 활성화 하기
플랫폼에 따라 `DFConfig.IOS_LOG_ENABLE` 혹은 `DFConfig.ANDROID_LOG_ENABLE`를 사용합니다.
```javascript
const config = {
[DFConfig.IOS_LOG_ENABLE]: true,
[DFConfig.ANDROID_LOG_ENABLE]: true,
};
Dfinery.initWithConfig("{YOUR_SERVICE_ID}", config);
```
### 로그 레벨 변경하기
`DFConfig.ANDROID_LOG_LEVEL`를 사용하여 Android 플랫폼의 로그 레벨 설정을 변경할 수 있습니다.
{% hint style="info" %}
로그 레벨 값은 [`android.util.Log`](https://developer.android.com/reference/android/util/Log#constants_1)의 상수 값의 정의를 따릅니다.
{% endhint %}
* DFAndroidLogLevel
* VERBOSE : `2`
* DEBUG : `3`
* INFO : `4`
* WARN : `5`
* ERROR : `6`
* ASSERT : `7`
```javascript
const config = {
[DFConfig.ANDROID_LOG_LEVEL]: DFAndroidLogLevel.VERBOSE
};
Dfinery.initWithConfig("{YOUR_SERVICE_ID}", config);
```
## 완료
SDK 설치 및 초기화가 완료되었습니다.